skip to main |
skip to sidebar
 Pat Miller at Needleartnut has finished stitching my little Halloween napkin rings - and they look wonderful the way she did them. I asked her to do this, as I hadn't a clue how they should be worked - I'm really really pleased with them, so do go take a look, and then see how she finishes them! WOW!UPDATE: Pat has finished the napkin rings - they look great, as she did an amazing job on them. They now look like napkin rings!! Just click on the link above, and you can click to enlarge the pictures. A reminder - these are on my Freebies, Etc. blog, so you can print them out and do your own.
 I can't possibly stitch an ornament to demonstrate this, as time is a factor - so am just showing it with a shaped outline, as the process can be easily demonstrated this way. I'm using two outline forms that I used to use for teaching beginners - back when we taught basketweave as the basic for fine stitching. People had to learn to stitch outlines within a design, and also odd shapes, as they needed to learn the concept of the outline stitch and having all the "tent stitches" going the same way on the canvas. Another way I use outlines also is to enclose an irregular shape within a design on a painted canvas when it is to be stitched with textured stitches and adjacent to another area, to eliminate ragged and unattractive edges. It makes the stitching sooo much easier! Also - on any ornament, as on my circles with bargello. Leaves no doubt as to where to begin and end "fancy" stitches.
  The second pictures is horribly blurry, but I had already started stitching the background before I unloaded it from the camera - but you can see where I marked three threads out wherever I could when t
 he stitches were on the straight vertical or horizontal. After that, it's a matter of "connecting the dots" to draw the outline for the background. As I've said, a really competent finisher doesn't need more than about two extra rows. Many designers don't add this, and I've seen stitchers and shop owners perplexed when part of the design was lost in the finishing - so I've made a point for many years of drawing the outline around the piece myself. I like the three rows, as with the light padding in the finishing, it leaves a slight bit of color around the design - kind of like a mat liner when framing a picture.
 The next picture illustrates how to find where to start this basketweave background. If you've learned properly, you will already know that one stitches UP on the weft (horizontals) and DOWN on the warp (the little bumps). This is vital to a really nice stitched surface - and also is a great way to understand where to start and stop. The piece of paper is at a 45 degree angle, so that one can see whether the first row of stitches is warp or weft. In this case, you can clearly see (click to enlarge the picture) that the row just under the paper is WARP, so the first stitches on the curve w
 ill be on the weft where the arrow is pointing.On the next picture, the stitching is begun, and the arrow at the top shows the weft threads where I'll start again after going down the right side. The lower arrow points to where the next thread will begin the stitches, as it's not a straight line from that curve up to where I stopped the stitching. This way, stitching up the weft will happen with no breaks - and again, the surface will be smooth.
 This second shape is a bit more complicated - and will illustrate some common mistakes people make in stitching odd areas, like the "V" at the top. This one is at the "dot" stage, and then the dots will be connected for the background outline. The arrows point to mistakes I made, which I will dot out with white acrylic - or just make the adjustment with my needle and thread when I get there.
  This is a choice we make when stitching - and is part of the art. We need to be able to judge whether a stitch is right to make the curve look pretty, or should not be done. This is also a plus for the well painted canvas, that there seem to be too few of these days. The choices of where to place a stitch shouldn't be difficult.
 On the last picture, the arrows point to where the next threads will be started.More about stitching in the next post - this is enough of my "pontificating" for one day.
 What a joy it is to stitch on a very small piece with such delightful colors and personality! Also a joy to be able to complete something worthwhile in a short period of time - a feeling of accomplishment without stress.Gail had sent me, along with the fish, a photocopy in color to show where to re-place the beads after removing them for the stitching, but I decided not to remove them at all, as it's simple to just stitch around them.
 Hopefully, in this detail picture, you can see the difference in the surface textures of the threads I chose to use. Silk would have been too smooth, so I chose to use perle cotton instead for the body of the fish. The floss, which is normally my preference, would have also been too smooth. (However, for a bit of contrast, I did use floss for the dark pink patch and the spots in the same color.) The perle cotton has a ropy twist, so makes the surface of the body appear a little bit rougher - kind of "pebbly."The green spots and also the yellow are YLI Ribbon Floss. This was used because the color is great, and the shine is a nice contrast against the more matte look of the cotton. Gail painted the gold parts in metallic gold, but the Kreinik I usually use seemed a bit heavy - so I opted for the YLI ribbon floss in Honey/Copper - which has a bit of sparkle. In person it is beautiful!! I didn't want a lot of glitter/sparkle, etc., as I didn;t want any distraction from the gleam of those gorgeous "pearls."
  It is always a good idea to stitch about three rows of basketweave around the ornament, as a few stitches would be lost in the seam allowance. A really competent finisher usually needs no more than this. I have shown with arrows that I drew lines 3 threads out from the horizontal and vertical stitches - even when there were only two or three stitches. Then, just "connect the dots" on the diagonal, and you will have a smooth, even and consistent seam allowance outline. The color was chosen to contrast with the body of the fish, and also to give the idea of the beautiful blue/green water in which this little fish lives and swims. It will provide a tiny outline around the shape when the finishing is done. Next on my agenda is this gorgeous little multi-colored companion, and I can hardly wait to get started. It will take some serious "pondering" (and a whole box of stash threads dumped out) to select the right threads and colors, as one mustn't just pick threads to match each little segment - they must coordinate and look right as a whole.
  Then comes the Sea Horse, which is one of my favorite critters of all - I have studied marine biology, and this animal is a fascinating one! Gail did a splended job of making him beautiful. These canvases of hers are giving me a great relief from stitching on my own designs - as that gets really tiresome. (especially when deadlines are pushing.) It's good to have friends who are great designers, and who also know how to put a design on canvas properly!! These are easy and delightful to work.
 At this point, it is just a matter of choosing the colors, placing them onto the design - and deciding on stitches. The two patterned patches - inspired by silk tie fabrics, are more effective placed apart and not touching. After placing those, it was a matter of laying a skein of thread (Caron Soie Cristale) onto a patch to see where it looked best in the grand scheme of things.The blue/green patch on the right came about, as the original color I chose was too light, and the darker one was too dark - so inventiveness worked here! I simply mixed them to create a sort of tweed look by using T-stitch, and alternating colors on each row. It will be most interesting to start choosing the colors for the seam treatments - and then on to the silk ribbon flowers to embellish. (and the beads!)
 I have shown this one before - one of my Talavera designs now produced by Creative Needle of Dallas, and inserted into the top of a gorgeous moire' jewel case (a built-in). It's almost finished, and only needs about another square inch of work, and a few more beads. I especially like the way the little green beads look placed in the diaper pattern area on the dots. I used red shimmer blend YLI ribbon floss for the bump stitches on the squares on the diaper pattern, as well as in the centers of the pink flowers. Otherwise - the pattern and vibrant color would be a mess if cluttered with any more textured stitches. The next post will be about another bit of buried treasure - this time Inge's beautiful bargello ornaments, worked entirely in metallics and in Christmas colors. Stay tuned!

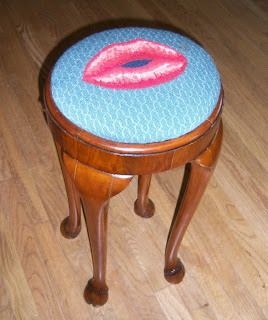 There is only one person on this planet for whom I will do custom needlepoint design - and my friend Marilyn is it! Why are all my friends equipped with a bizarre sense of humor? I fought this one for two years, as I thought the gorgeous stool, an antique she purchased in England, merited something with more dignity.( I dont know why I bother to argue, as she always wins.) She brought it over to show me a little while ago, and I laughed out loud when I saw it. I don't know if the picture is clear enough to see, but the cabriole legs end in hooves! Who else but Marilyn would want this cover for it. Do notice the beauty spot by the lips- and the lovely diaper pattern background. We taught her housekeeper, Veronica, (in Spanish) to stitch background, and so on to the next project. I'm wondering "what's next?"

My friend Gail Hendrix has now, to my delight, started a blog that we may go to for enjoyment of whatever she is up to now. I only discovered her (via another blog) last fall, and now have shown her work in two articles in Needlepoint Now magazine - with great response. This woman's work makes me want to cancel all work and appointments, and just have time to stitch her goodies. These crabs are too cute. Sophisticated whimsey type stuff. They are intended as frame weights, but since I do not use a frame for my needlepoint, I had rather thought to fill one with bb's or something similar, and use them as paper weights. Great gift idea! Gail's work is all stitch painted, which makes it very easy to work, and very enjoyable! She has some new ones, which you can see on her first blog entry here. Soooo - I will show one of my favorites,  which I hope to stitch for myself after I finish several others of hers - plus those gorgeous American Girl doll ornaments (see my previous post on these.) I had asked her for Josefina and Felicity - and understand they are coming right up!! I had better get busy.
 Pat Miller at Needleartnut has finished stitching my little Halloween napkin rings - and they look wonderful the way she did them. I asked her to do this, as I hadn't a clue how they should be worked - I'm really really pleased with them, so do go take a look, and then see how she finishes them! WOW!


