Saturday, August 30, 2008

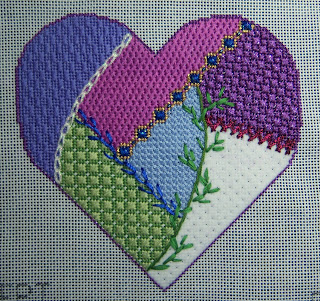
Crazy for September is finished!!

While getting toward the end of finishing this piece, I realized what a great part of the creative process "balancing" must be. The design elements must be in good balance according to size, shape, and color, in order to hold the eye in a pleasing manner - whether the artist means to evoke excitement , serenity, or other feelings that might be. I also realized, as I was quite tired of this particular crazy quilt rendition, that I had worked too long and too hard in order to meet my own deadline, and lost the pleasure in it. I need to work on balance in my art and my needlework - between what I do for my business, and what I do just for relaxation and enjoyment.


Designing has been my life's work, and I do enjoy it - but it still requires a self discipline and occassionally long and strange hours to meet deadlines. Needlework and pottery are also very therapeutic for me - and I don't do nearly enough lately "just for myself." I must work on that - and throw in a bit of gardening and walking when the weather cools down. A good balance in these aspects of my life!


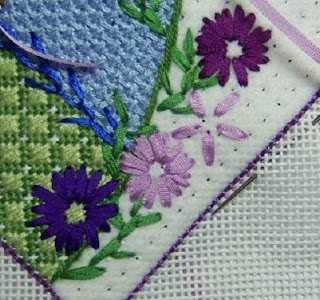
As for the September Crazy Quilt - it's done, and I'm pleased with it (at least for now.) The first step in the embellishment, after the seam treatments, was to stitch in the background leaves, following the curve. This was done with 4mm ribbon from RiverSilks, which is beautiful stuff, and it holds up well in the stitching. The little asters were begun by just placing them one at a time wherever my eye landed - using 2mm silk ribbon from Thread Arts of Houston. It's great ribbon, and the only 2mm I've been able to find - it works well and doesn't fray at all. I chose the 2mm, as the asters have tiny petals and this gave the best effect. The close-up illustrates the beginning of an aster, and how to manage to make it round - I just place five petals in the size and shape I need, and then go around the flower filling in with more petals until it looks right. The centers were done when the flowers were finished, and are French knots made with Splendor silk. Beads were added when everything else was finished.


Friday, August 29, 2008

Opals and the Internet

I'm getting a bit ahead of myself, as I finished the September "Crazy for Birthdays" last night - but this was exciting, so I want to go ahead and show it! I had been agonizing over creating "opals" in needlepoint for some time - researched on the internet, of course, and couldn't decide on colors, much less threads. My grandmother had opals, but they were light green with a bit of fire in them. Actually, they seem to be available in many different looks, depending on the part of the world in which they are found.
Part of my dilemma has been that opals glow rather than sparkle or shine, and this isn't easy to create with threads. I had whined a lot to my friend (again, internet) in Everett, Wa. at The Needlepointer, about this - so she sent me some possibilities, including petite Treasure Braid by Rainbow Gallery - which I had not seen. Then - moving along with this story - I was having my morning coffee chat with my friend Laurie (internet) in Los Angeles, who suggested threading a length of Flair with the Treasure Braid and a light turquoise of some sort for that bit of blue fire seen in the white opals. It really wasn't that difficult to do - I used two threads of the braid, and 2 ply of Splendor in a light turquoise - using a tapestry needle a bit larger than the one I use for stitching on coarse canvas. To avoid snagging the tip of the needle in the Flair, I pulled it through eye first. It wasn't as tedious as I thought it would be, but I won't make a habit of it. The stitch is simple Scotch stitch. Here is the result - OPALS!!!

And now I'll go put on a pot of fresh coffee and prepare to pontificate about my September Crazy Quilt heart with its fine little asters.


Wednesday, August 27, 2008

The September Crazy in Needlepoint


I worked hard today, and finished all the patches - ready to do the seam treatments, and then tomorrow the silk ribbon asters. These will have to wait, as I would probably make a mess due to tired fingers and sore eyes! I already see a place where I failed to leave an open stitch for a bead - but this is crazy quilt, after all. I can cover any boo-boos with a bit of embroidery! (I have tried to make this post format correctly - but apparently this won't happen tonight - sorry!)


Tuesday, August 26, 2008

Something Beautiful!!


This is a short one, as I'm tired tonight due to what my grandmother used to call "that thinking work." My brain wires are short circuited - but I found this site in a round about way this morning, and wanted to share it - it's gorgeous, and will lengthen my morning coffee/blog cruising time considerably. Bear in mind this woman hasn't been doing CQ but a few years!! The site is by NickiLee - and she calls it
"Nicki Lee's RavioLee Dreams." Do go there and take a look! Among other eye-candy she creates, she hand dyes these laces. Exquisite work.

Sunday, August 24, 2008

Crazy for Birthdays: September

One thing leads to another, and it occurred to me as I was working on my "jeweled chains and trims" series, that the jewels could easily become part of needlepoint crazy quilt! My older daughter has a September birthday, so it seemed a great place to start. Of course the research had to be done into the "why" of the stones and flowers, and I found that the origin of assigning precious jewels to each of the 12 months, apparently has it's beginnings in the Bible, as 12 precious stones were assigned to each of the 12 apostles, - and earlier, to each of the 12 tribes of Israel, beginning with Aaron, the brother of Moses. The use and meaning was interpreted differently in different cultures - as they also were assigned to the signs of the Zodiac.

The birth months are also represented by flowers, which is mostly derived from the Victorian love for floral symbolism. The flower for September is the aster, so I found this picture for color and for form - and will use 2mm silk ribbon to get the effect (as well as having chosen the thread colors in this palette). As always, for the crazy quilt thing, I dig into my stash for everything I can find in the colors that might work - but always end up discarding some and adding others, as it changes as I start stitching each patch.


Next, a pattern is sketched onto tracing paper, and then inked when it suits me. The basic heart ornament shape (5 1/4" wide for this one) that I keep on file is drawn carefully onto the canvas, and then the lines are traced onto it from the paper pattern (as always, using the Pilot ultra-fine point permanent pen that I prefer.)


You can see that I have already added a color or two and subtracted another. I do like the effect of the sapphires, which were acheived with Renaissance sprinkles for the big bump stitches, and dark blue beads for the little links on the chain. I haven't decided what color the beads will be on the white Petite Very Velvet - that will come later, but the beads on the green patch will be my favorite effect with the clear (#250 Sundance) attached with green floss. So now I'm off to stitch some more. I already have June ( pearls and roses) drawn, and also October (opals and calendulas). Figuring out how to make "opals" has been interesting, to say the least.

Friday, August 22, 2008

Quilted Eggs in Needlepoint

It seems that my friend - designer Anne Stradal - was way ahead of me, and thought of making a three inch design with 18 stitch quilt squares way before I did. I wanted to show these beautiful things, as they are quite remarkable. I have enjoyed designing on the egg shape for many years - so asked her why she does, as she calls hers "eggs for all seasons." Same reason that I do - she just likes the shape. I did some research into the symbolism of the egg, and it seems that it is a universal symbol for probably several thousand years in many cultures and religions, predating Christianity, of renewal and rebirth - or even the birth of the universe. (For a designer, the spheroidal shape is much more interesting than the circle.) Remember too, the Faberge' eggs made by Peter Carl Faberge for the Romanovs were gifts "for all seasons" as well - being for birthdays and Christmas as well as for Easter - and one to commemorate the coronation of Nicholas II.
This one is called the "Lelani Egg" and looks just like a tiny Hawaiian quilt - lovely thing. These would be so much fun to work out stitches and to use threads we already have in our stashes, as we do buy the ones we like best!

The breast cancer egg, of course, symbolises renewal and hope. It's new - and I think very special. It isn't a quilt pattern, but I wanted to show it anyway!


The blue and white is another version of the American Patchwork.

Friday, August 15, 2008

Iznik Ceramics in Needlepoint


My stash of unstitched canvases is rather embarrassing too, as I can't resist a really great one. As I've said before, Inge (of Creative Needle) and I seem to work in parallels when neither of us is aware of what the other is doing. About the same time I became interested in the Spanish and Mexican Talavera. Inge had discovered the Iznik ceramics. My friend Marilyn had also brought me back from Istanbul a book on the tiles of the Mosque of the Rustem Pasha, which was built at the height of the Ottoman Empire. I have studied the Oriental porcelains thoroughly - and was amazed to find that the origin of the Iznik was an attempt to imitate the fine white clay of the Chinese, but lacking the kaolin, made do with a low fire body and tin oxide glaze. The earliest ceramics were blue and white, like the Chinese - and this traveled across Europe to Spain with the Muslims, who were superb potters. They setlled in Reina de la Talavera, and developed a distinct style - which then traveled to Mexico in the early 16th century. The Chinese influence in design and the blue and white coloration were still there, but in Mexico, (Puebla de los Angeles) the polychrome was added. Gorgeous stuff - and fascinating to study.


Anyway, Inge and I agreed that she would develop the Iznik designs, and I would do the Mexican Talavera in needlepoint - I really really love these colors, so begged this one from her. These are more plate pictures I have found!. The tiles of the Rustem Pasha Mosque have the beautiful Persian turquoise elements, as these were used by that time. Finding this canvas has caused me to realize that I need to practice some BALANCE in my stitching - I have not made time to really enjoy needlepoint and relax, due to being caught up with deadlines and stitching models, etc. that have to be done. Also, in my design work - the balance has been absent for quite a while. I used to enjoy the creation of a rather elaborate canvas with an interesting origin - as the antique ceramics I enjoy so much, and lately the American Pueblo pottery. In the past, I was rather "well-rounded" in this respect. Lately, I'm a bit lopsided. Must work on it!!


Wednesday, August 13, 2008

Mini-Stocking Finished! (a tutorial)

This was just getting started with the cuff - where you can see the "A" begun with basketweave on every other row - warp threads only, as the beads will need to be placed in the "dips" of the weft. I used YLI Ribbon Floss for the background, as I didn't want the matte look of the Very Velvet of the body of the stocking. This, incidentally, is a great example of something simple and quick, sparkly and glittery that can be done with just threads left over in the stash from other projects.
This is the back of the cuff, where you can see the basketweave worked smoothly, skipping under the drawn letters. This should always be done, rather than starting and stopping and going around the lettering, as it prevents the unattractive "pin hole effect." Basketweave, smoothly and properly done, makes a really nice, padded, smooth surface, as opposed to using continental or half cross, as so many are tempted to do. These two stitches should NEVER be used on mono-canvas, as it can't hold the stitches evenly, and that ugly horizontal ridging occurs, along with uneven stitches - no matter how much care is taken.
Another important thing to remember is that the white or light colored background needs to always be done before the colored elements - as tiny fibers will pull loose otherwise, and make the edges of the white look "dirty" or fuzzy when it is pulled through the mesh next to the color.
This is a shot of the name on the cuff almost finished with beads - you can see how they were placed into the weft threads that were left bare. And last, the finished mini-sock!! It will be lovely in the firelight of Nina's house on the mountain - if she doesn't blow up her stove and get soot all over it.
Due to the velvety texture of the Petite Very Velvet (Rainbow Gallery), I used just basketweave in the body, as any textured stitches don't show up well. I did put "T-Stitch" on the heel and toe, as they needed a bit extra - it barely shows, but enough.


Saturday, August 09, 2008

TIFChallenge - Juggling vs. Balance?

But first the colors! I have pulled out, over the past week, everything I came across in my stash, as I raked through drawers and boxes looking for other things, (juggling projects in work) that are compatible with the beautiful colors this month. Actually, I have two more bags full of threads and beads and silk ribbons in these colors, as they are perennial favorites of mine. No room on my work table for them all right now - so here are a few for starters.


In my mind, I am beginning to see maybe a needlepoint crazy quilt purse front with these - adding a bit of Vintage metallic gold, of course. The usual M.O. for me is to sketch a design format first, and then pull out a few of the most compatible colors - (have to eliminate a bunch.) As I have said before, pre-planning doesn't always work.

As for "balance" - When I finished my education and set out to join the big circus called life, I found there are two separate acts - one is called "juggling" and one is called "balancing." The juggling, I believe, is getting everything done in a day that is required for maintaining home, children, husband, work, - all that goes along with necessary daily activities. It's quite a feat keeping all the balls in the air and turning smoothly and evenly. I see the "balancing" as walking along the high wire with a long pole held in both hands to keep us from tilting to one side and crashing down into oblivion. On one side, there is the juggling of necessity of the things of life. On the other side, there are the activities that give us respite and rest from these, which we do need on occassion. We need these in equal parts for good balance in our lives. This has been difficult for me, as I am a working artist - and a bit driven, so resting and taking a break usually involves some other artistic pursuit.


I joined this Take It Further Challenge "just because" to give myself that wonderful break that is creative, but yet has nothing to do with income producing activity or things expected of me by family and work. A walk on the beach is also a form of relief and release for me, as the wind blows away the cobwebs in my head - and I really need to do these things to achieve balance in my life between work and family on one side and rest and play on the other, ideally in equal parts. Sometimes it's hard to know the difference! I just found this in my pictures file - I also knit, which gives me a splendid break from needlepoint design - kind of shifts my gears and gives me a rest. This is from my "knitting with fabric strips" phase about two years ago - Yin and Yang!! Great illustration for "balance"

Thursday, August 07, 2008

Excitement - a New Store!

We all just got lucky - great event! Gail Hendrix now has an e-bay store. Many of us have enjoyed looking at Pat Miller's blog, Needleart Nut, where she stitches Gail's marvelous birds and mounts them on stands - complete with tail feathers, personalities, and beady eyes. Until now, Gail has been totally wholesale, and her work was found only in shops. Love this internet! I'm showing these two ornaments, as my beloved north Florida (Tallahassee and the little towns heading down to the coast) is on my mind these days. Tallahassee isn't palm tree and flamingo country, (but the 'gators are there) -nevertheless - these things are to Florida as Longhorns and bluebonnets are to Texas. You can go to Pat's blog to see the birds, in progress, stitched, and finished.
Notice, as you enlarge these pictures, the wonderful charms and other embellishments she adds to the canvases - as the millefiore beads that look like oranges and grapefruits - and notice the flamingo angel tree topper! I will enjoy stitching this one. Do go to her store and look at her other goodies.

Saturday, August 02, 2008

Jewels and Talavera

This isn't "resting" and taking a day or two off - it's more creative avoidance, as I should be working on two specific projects I'm not looking forward to. Responsibility. Perseverence - all that. Anyway, this is a progress report. The mini-stocking now has a name. I will probably do the bead thing on the letters, as it has those spots of glitter that look so fine against the Petite Very Velvet of the background on the body of the stocking. This thread doesn't really show up well except as basketweave, in which it resembles a patch of velveteen - beautiful for showing off beads and the Vintage Kreinik gold braid. I did work the toe - and will do the heel - in T-stitch, which barely shows, but gives just a bit of texture interest which was needed.


I don't like counting - and will not do anything in which I have to look back and forth between a chart and the stitching work - My idea of "counted canvas" is to count with the drawing pen before I start. (Anyone who can count to 4 can do this pattern.) by doing this, it is easy and relaxing to stitch without having to think or count!


Next, while I was painting an order for a Talavera mini-stocking, I found two more drawings I had never painted - and a third one that made a great companion with the one I was painting. I decided to go ahead and paint these while I had the colors mixed. That is classified as "work" I believe, so now I can play a bit - and then do the BIG ONE I've been avoiding.