Friday, March 30, 2007


A new addition to my already formidable stash is always exciting - although I am dreading having to pack it up and move it in May (hoping I will have a new house by then.) Anyway - I received these gorgeous silk ribbons yesterday from Cecelia at The Thread Gatherer, and am really motivated now to start embellishing the Art Crazy Quilt pieces in needlepoint that Allison has so generously let me use for my needlepoint "translations." I hope I am worthy of the task!!!!

Friday, March 23, 2007


In honor of Allison's visit to Mexico and being influenced by Talavera ceramics - a few more of my needlepoint renditions!!


This is the fun part!! Getting into the "stash" and choosing fibers and beads.


While Allie was gone luxuriating in primitive bliss in Mexico, I was working hard on practicing for THE BLOCK. I learned many years ago to do something of use so as not to waste time and materials when working out new effects- so this is how it begins:

I chose a colorful and interesting (klepped from her blog with her permission, of course) border block from the Fan Quilt (in progress) Starting with a small piece is easier - so I shaped it as a Christmas ornament - always a good use for small practice pieces.


This is the work table "in progress" (the paperweight cross with shells is one I made in pot class that I didn't send to the garage in disgrace). Notice that there are other JC Fan border blocks as well, and lots of tracing paper and little sketches, etc. Good "images" to impact the mind. I will begin stitching today!

Thursday, March 15, 2007


It has been a month since I made that resolution to post more often. Being busy is good, but time flies! It always seems to be of interest to people what inspires a designer - My earliest inspiration, and probably the best work of my life, was the Imari porcelain reproductions. Working from the early to mid 19th century Japanese pieces was a learning experience, and a visual joy. Also, the gorgeous colors and symbolism of the Chinese Celadon was inspiring. Recently I have re-discovered an old love of mine - the Mexican pottery. Now called "Talavera-style" to differentiate between that and the traditional Spanish Talavera maiolica (produced in Puebla since the 16th century), it is, by law, produced with no lead in the glazes, and is truly wonderful to behold. The exuberance and joy of the design and colors of the Mexican pottery is wonderful to work with. Talavera-style means that it incorporates the same symbolism as the very elegant Spanish pieces, along with the geometrics that I like as a mathematical challenge - and that symbolism actually kind of traveled the "silk road" all the way from the Orient to Spain many centuries ago. (as well as the colors) The Orientals were done on porcelain, whereas from the middle east toward the west, the ceramics were made of earthenware and glazed with tin oxide to get the white background. (This was quite a learning experience - I enjoyed researching it!) Anyway - besides rearranging motifs and turning round platters into square needlepoint pillows - it occurred to me to use those delightful colors and motifs on Christmas stockings - from mini-socks to full sized ones. I have never done Christmas per se in my almost 40 years of designing - there are plenty of very talented designers out there to do it, and it actually just never interested me. However, these little stockings are definitely different - and I think a nice change - from the same old thing that we are a bit weary of looking at.

Thursday, February 15, 2007


A new resolve!!!! I have spent so much time looking at OP blogs (Other People's) that I forgot to attend my own. They have been entertaining, motivating, and inspiring - so I shall try to do the same with mine. Lately I have been totally absorbed in designing and stitching interpretations of Art Crazy Quilts, and have spent hours and hours admiring and drooling over Allison Aller's work. (with her encouragement - and, I'm sure, curiosity.) Anyway - along with this suddenly dropped into my lap the opportunity for a designer profile on the Caron Collection web page - which includes pieces stitched totally with their threads. It has been a delightful experience exploring and discovering these gorgeous fibers - all natural and no synthetics. (except for a few decorative ones, which I will use for Christmas.) This piece hasn't been embellished yet - so here it is "before." "After" will follow shortly when this dreadful weather lets up and I can go shopping for more threads.
Notice on the close up that the little French knot "berries" appear to be shaded - this is one strand of the overdyed cotton "Watercolours" - delightful effect. I also used it on the flower "trim" where the shading is a bit more subtle.
The yellow patch includes my "beading technque." More on that later
Meanwhile, look at Allison's web page and also see her blog. Lots of good links, too. http://www.allisonannaller.com

Thursday, November 09, 2006


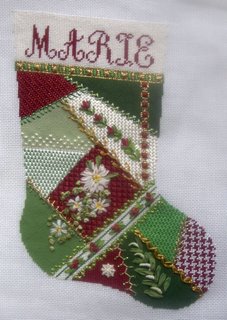
Wooo Hoooo!!! I finally overcame my fear of forgottten skills and finished the big one!! (The Marie stocking) The lower picture is showing the seam embellishment, which was lots of fun once I got started. Then, (top left picture) I started to play and create!! In the beginning on this one, I determined to absolutely use nothing but what I have in my stash - and everything in red, green, and gold. Would you believe, I had to buy nothing!!?? The only

problem I had was making myself stop. I had, in the beginning, thought to stay with tradition and history from years of studying and loving the Victorian crazy quilt - and then a new, very very talented friend and crazy quilt artist, unbeknownst to her, encouraged me, with all the wonderful fibers and fabrics and threads and beads and metallics we have at our disposal, to make it joyful and uninhibited and just plain exuberant. If you haven't found this lady, look at www.alliesinstitches.blogspot.com/ and sigh and dream and enjoy as I have over her work. With mine, in the off and on 9 years or so I have been working on "interpreting" crazy quilts in my own medium, needlepoint, I have endeavored to recreate with threads and stitches the textures of the fabrics themselves - and silks, velvets. etc. (even the houndstooth check is a "freehand" I have worked out). The laces and trims I have charted, as they are worked as an integral part of the stitching and not just lace glued or sewn on as some designers have done. The seam embellishments are done on top of the finished stitchery, and then - JOYFUL MOMENT the silk ribbon flowers are added. and a few beads here and there. And then I had to force myself to stop and plan the next one. The three mini-stockings are new also, and incorporate the animal skins I love for the beauty of their patterns and colors. I was especially pleased with the way my new "leaf trim" works with this theme. And my French Knots didn't fall out. MAJOR ACHIEVEMENT!! I will have the painted canvases for these and others similar as soon as I figure out how to write the stitch guides and instructions. Also, it's hard for me to put down the stitching now that I have it figured out!! I have spent happy hours studying Allison's beautiful work and figuring out how I would interpret a spray of yellow flowers and a scattering of small roses over several needlepoint patches!! WHAT INSPIRATION!

Tuesday, October 17, 2006


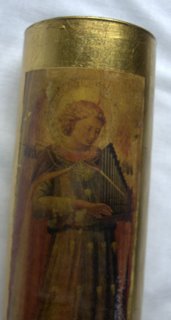
TRANSFER ART? A mis-nomer!! When we were first doing this about 35 years ago, we simply called it "making transparencies," and it was done by applying coats of acrylic polymer medium to a picture, and then adhering the resulting "decal" to whatever surface we wanted to decorate.
As I have mentioned so many times before, my love of beautifully made artisan crafted decorative accessories has led to what has been my passion/obsession and livelihood for many years. I was standing at the kitchen sink this morning and got the giggles at what I was doing - soaking eggshells and peeling out the membranes and stashing them in an old coffee can. Also washing out used tea bags to add to my "stash." (for collages). This is SSD at its worst - only mine isn't seasonal, but chronic. (seasonal stash disorder according to Jane Thornley of the beautiful knitting.) Mine also includes beads threads, yarn, fabrics, and anything else "crafty." My children are going to know for sure when they clean out my house that poor old Ma was a bit deranged - but they have probably suspected this for years. I also hoard graham cracker and cereal boxes for the cardboard. I will explain this one at a later date. Anyway - I was thinking back to the mid '60's when I first started doing these things "for serious" and selling my work. I used the money to hire a housekeeper. There were no chain craft stores and no "canned crafts." (kits) The activity was much more satisfying and materials used were not mysterious and expensive. There was a French papier mache artist whose production center was in San Miguel de Allende, Mexico - beautiful, exquisite work, mostly on wooden boxes, waste baskets, mirror frames - that sort of thing. Those items were sold in this country and probably in many others in fine boutiques for very high prices. I decided while living in Mexico City to drive over to San Miguel to investigate and learn the process if I could - and to my amazement, it was a lot of cotton cording, torn up newspaper, split peas and lentils, acrylic paint, and Elmer's glue. "Antiquing solution glaze" was instant coffee. Best of all, the "porcelainizing" was done with layers of glue and a coat of clear, high glss acrylic glaze. WOW!!! I studied a lot of crafts in Mexico, and came back with enough material to start my newspaper column, which soon became syndicated. The materials used for some of the fniest items were so simple - just things found around the house, and the knowledge of how to use them to make something beautiful. The illustrated glass vase doesn't show up well in this photo, but I found it at my son's house - a project for Christmas several years ago. I think the process is now being called "transfer art" and requires a bottle of something called "transfer medium." For the almost 40 years that I have been doing this, it has been a simple matter of making a transparency by coating a picture from a Christmas card or note card with Liquitex acrylic polymer medium/varnish, soaking in water, and rubbing the paper off the back. In this case, I applied the transparent "decal" over gold leaf (on a glass vase) which glows through the picture - GORGEOUS!! I also do candles this way, and the light glows through the picture, illuminating it. Instructions are given on my web page under "JOURNAL" - Go there and take a look!! and enjoy this art yourself and see what you can create.

Friday, September 15, 2006


NEEDLEPOINT CRAZY QUILT: Christmas stocking A genuine Victorian Crazy Quilt from the mid to late 19th century is a visual "feast," and worth studying from many aspects: The orderly chaos of the patches, the fabrics and colors, and, above all, the embellishments. As a needlepoint designer, I have, from time to time over the years, played around with interepreting the effects on canvas. Lately, in the last few years, I have especially enjoyed this avenue of creativity, as the variety of threads , beads, and other such delights - including silk ribbon for embroidery and making flowers - seems endless. My usual approach to a new design is to plan and draw the canvas first, and then go buy threads for the stitching. However, in the true spirit of the earliest of the C.Q. patchwork, I pulled out my thread stashes, and decided from what is already available, the colors and textures of the patches. And ---- instead of sticking to the old traditional colors (which I love), I am, as the earliest patchworkers did, creating f rom what I have! (of course if I run short, I can always go to the nearest needlepoint shop for more.) The picture is of a Christmas "mini-stocking," all bright and glittery. I endeavored to reproduce the textures of various fabrics - velvets, satins, gingham or houndstooth checks, twill, etc. The embellishments will be added soon - and will include silk ribbon flowers and embroidery stitches along the "seam lines." Notice that the "Lace" is actually stitched right into the needlepoint with bump stitches, rather than gluing on a piece of lace, as I have seen done. The "ruby" bracelet is mine (my birthstone) - and was an afterthought (or wishful thinking). I rather like it.!!!!! Come back in a few days to see the finished piece - ribbon roses and all.

Wednesday, September 13, 2006

Unbelievable!! Yesterday I could not get a picture posted. Today, for over an hour I couldn't even find this blog. There is hope for everyone!! I was out walking this morning, looking at the beauty around me, even to flower petals and leaves fallen off their respective hosts and into the street - and thinking again how inspiring the smallest bit of nature is to an artist. We do, indeed, see the world through different eyes, and endeavor to bring others to see what we "see." Where I live, the leaves are falling off the trees not because it is fall already, but because it has been very hot and there has been no rain for quite a while!! I start looking for leaves this time of year in yards and in the street to use as pottery molds, (leaf mold sounds more like something you fertilize the flower bed with than something used to make a ceramic tile.) as ingredients for collages - and a number of other things. The shapes are quite incredible. The illustrated needlepoint canvas really has nothing to do with leaves and nature and pottery, but I chose it as my last effort at posting a picture to this blog. Now, if I can manage it again tomorrow, I will be quite pleased with myself. Back to the subject of leaves - I even treat some of the larger ones to gold and silver spray paint for Christmas decorations. Very effective!!