Monday, June 18, 2007


This is moving along nicely now - and I'm beginning to really enjoy it!! Since I removed the restrictions of deadlines, I actually look forward to working on it. I think I had more to say, but it's evening now, and I have spent the last two hours entertaining small grandsons who are still young enough (one is age 4) to enjoy playing roles - this time a prince to vanquish the dragons at play school. We are, with his father's help, making a shield. I feel like I have marbles in my brain. Granny doesn't cope as well with pandemonium that comes with great enthusiasm, but I am grateful for the opportunity. Whew!!! Now back to stitching. I finally saw the light and bought chenille needles for the embellishing - the tapestry needles were awful to try to push through stitched canvas. After all these years - I finally thought of chenille needles. I'll probably bloody the threads a few times, tho' before I get used to it. Anyway, in my mind, I can already see the pink beads on the orange patch on the heart, as well as a fine looking vine with flowers and clumps of French knots on the big curved seams.


Tuesday, June 12, 2007


Another post of my ceramic pieces - mainly to stall until I get more done on the current crazy quilt needlepoint projects (two of them and two more "brewing"). Also drawing several new Talavera pieces. Anyway, the plate is one I found at my daughter's house - I was quite touched, as I didn't know she had found it and put it into her "shopping bag" at some point. It was an experiment in the early days of my working with design painting with underglazes - and forming plates and bowls by just laying a slab of rolled out clay onto a china plate or into a bowl and gently working it down into shape. I love this effect, as the appearance is "hand made" and not mold poured or otherwise mechanically generated. I have only recently come to this conclusion, as I thought they were too crude and misshapen to show. The two-color bowl with leaves was a fun thing - I was working on glaze layering and sgraffito. Just formed the bowl by laying the clay into a soup bowl in my kitchen, letting it dry a few days - then firing and subsequently decorating. This was done with the two green glazes - half light green, and half dark green. Then the process was repeated, but putting the dark over light and light over dark. The sgraffito was done by scratching the design down to the color beneath with a semi-sharp instrument (don't remember what, but it was something I dug out of a kitchen drawer, I'm sure) Notice the squiggly line down the center. I was overjoyed with that effect!! The thing was then hustled off to the art museum for firing (after applying a suitable clear satin glaze.) One of the things I love about this sort of ceramic activity is that it is not instant gratification, but a time of anticipation in waiting to see what emerges from the kiln.

Saturday, June 09, 2007


Ceramic crosses and tiles?? and also bowls and plates and vases and pots? Of course I do!! and it's all hand built on my kitchen table or while sitting on the floor in my painting studio. I don't even own a potter's wheel, and have never used one. Strangely, I have had several people ask in the last few days, expressing a bit of surprise. I have wanted to do this since college, but didn't have time. Several years ago I finally indulged myself with classes at the local art museum, where instruction is superb and lots of fun. I had just put my "Alzheimer's auntie" into the nursing home, and was having a terrible sinking-into-depression episode after walking on a tight wire for several years caring for her. I thought I needed to seek professional help - but decided on another course of action, as it made no sense to me to pay someone $150 per hour to listen to me whine and complain (and put me on drugs) when I already knew what was wrong. Sooooo it has been the most wonderful and therapeutic thing I have done in a very long time, and actually a fine social activity once a week. It's also a cure for PPD (post project depression) after a major thing is completed in needlepoint design. This is a thing I do only for myself, and really never thought I was very good at it - so most things went to the garage in various stages of contempt on my part. I hid them from my children, who decorate their homes with exquisite taste. To my surprise, when cleaning out the garage preparing to sell the house, a few things actually looked good to me. Further astonishment came when ladies of the local Episcopal thrift shop came to claim donations and wanted to buy these lovelies on the spot. I will put them on my web page, but to give instruction to show people how very very easy it is to do these things at home with simple materials and a few basic instructions. I do not want to sell them, as it would take the joy out of the activity for me - as I would have to worry about production, pleasing the public, trends, etc. and also pricing. My youngest son, Sam, has expressed the same sentiment as we have chatted about his superb hunting bows - his blog is totally to give away information and share a very satisfying hobby with anyone interested. Soooo - from time to time I will show some of this work, and also put them on my web page with total instructions. For example, the vase (which I do like) is simply a rolled out (with my biscuit and pie crust rolling pin) slab of terra cotta clay, wrapped around a glass vase for a mold - and acanthus leaves applied, which were made in a mold from pressing clay onto a planter and then firing the reverse clay image. Easy? The glaze is just Amaco LG-11, which well imitates the tin oxide glazes of the early mailolica ceramics. The little sea shell cross paperweight was made easily also with the same glaze. I made the plaster mold for the clay shells from actual seashells. I was amazed recently to find one of my plates from my experiments into painting with underglazes and maioloica techniques in my daugher's kitchen cabinet. You never know what they are going to dig out of your closet!! It is very flattering in this case to me that she would like it. I'll show it later.

Wednesday, June 06, 2007


This pillow in needlepoint was begun several months ago in the same spirit as the seashell that ended in disaster in my UFO box (couldn't discard it!!). I decided it needed to be done - and by a deadline. Although the drawing was carefully thought out, and the colors chosen and arranged, the decision to put the "crocheted lace" border around it was not, at the time, a good one. I soon put it away, as I couldn't bear to think of all those bump stitches in a limited amount of time - a bit over-ambitious. I brought it out again recently, and decided to use it as a relaxation piece - just enjoy the journey and not worry about the destination. This has made a great difference, as I find myself wanting to do just a little bit more of the lace - it is wonderful to see the thing emerging as i do more white bump stitches and then a bit more background around. It's kind of like painting on blank, white canvas with a needle. I am having the same experience with the "crazy" patches - thorougly enjoying the process without worrying about time and the product. I have even discarded the drawing with little pieces of thread and notes on it, and am just designing as I go. Can hardly wait to get to the embellishing!! Moral of the story (as I remind myself) Relax and enjoy the journey!!! Isn't that what needlework is about? The "lace" is an old charted thing I did many years ago to imitate crocheted lace in needlepoint. Lots of little bump stitches and a colored background - a fascinating and mathematical thing to plan. I am so encouraged by this experience that I have decided it is time to start on the block that Allie made for my magazine article. (You can find this on her blog in the March archives) I love the colors and the fabrics, and I am getting a bit tired of the intensity of the colors I have been working with. Something to look forward to, definitely!!

Monday, June 04, 2007


It's amazing what happens when one's computer is not available for jigsaw puzzles, chatting, and other fun and games. Mine had a bit of a problem with the thunder and lightening storms last night, and developed a loose connection somewhere until about an hour ago. (sons-in-law are handy people for things like this). Anyway, I finished the first little heart CQ in the interim and drew and planned the next one - a little larger and more ambitious. It is amazing how the light strikes the surface of the stranded silks (these are all three "Soie Cristale" by Caron Collection.)and creates a texture of its own. Also the beads - I used orange beads on the pink patch, thinking it would make fine sparkly polka dots, but the iridescence and surface reflections took on more of the background color - a really lovely effect - one of those happy surprises. I am still a bit clumsy with the surface emboidery, as the canvas + stitching makes a heavy ground to push a tapestry needle through. Maybe I need to get a chenille needle. Anyway, I have already planned colors and patterns for this next one, and will start on it tonight if time and energy permit. I must remind myself to "enjoy the journey," as the "destination" of the finished patches ready to embellish call to me here. In my mind's eye, I can already see the floral vine along that long, curved seam. Of course they never look quite like I pictured them - but sometimes even better. If not, I can just rip it out and try again.

Saturday, June 02, 2007


The terms "sane quilting" and "crazy quilting" make perfect sense to me - but I am wondering how acceptable it will be to differentiate needlepoint between "sane needlepoint" (which it isn't always, in my opinion) and "Crazy Needlepoint." I have decided to just call it "Crazy for Needlepoint." ?? Anyway, as it has been suggested by a certain friend, I am working on crazy hearts. Starting with a rather small, simple one - it was fun putting those orange beads into the pink area, and plotting the little floral "lace" trim onto the canvas. (This was worked with Smyrna Cross "bump" stitches before the patches were stitched.) As usual, the embellishment is a terrifying and intimidating prospect - but I will give it a try this afternoon. I promise I will. Maybe. That "cranberry swirl" silk ribbon (from the Thread Gatherer) is yummy with this piece, as it has just the right cast of pink/orange/red. It should do a lovely flower or two on the green patch. Yet to come is the larger heart with the first curved seam I have attempted to embellish. Later. It is drawn, colors and stitches chosen, etc., but not started yet.

Sunday, May 20, 2007


The soul requires creativity, whether planning and planting a garden, cooking a fine meal, or - in my case - producing a piece of visual/tactile artwork in the medium of fiber arts. Since discovering the Art Crazy Quilters via Sharon B.'s blog - and from there, "Allie's in Stitches." I have felt like a student at the Prado (Spain's wonderful fine arts museum) - learning technique by copying the masters and then developing my own style. My venture into the CQ format several years ago was simply to provide attractive and interesting backgrounds and shapes for silk ribbon flowers. At the present time I am intently studying the seam embellishments - especially on curved seams, which I had not done before due to the evenweave grid of needlepoint canvas. There has to be a balance on a piece of needlepoint between stitching the background (entertainment value) and embellishment, which is the icing on the cake and more instant gratification. (in some cases) Sooooo - this means simplify, while trying to achieve the same lovely effect. One more ornament from the Fan Quilt - and this one will be great tree decor when finished with tassel and beads. I won't repeat the picture of the original block I used as inspiration, as it is in two previous posts - last month, I think - or you can see it on Allison's blog under the border blocks for the Fan Quilt - or "seam treatments."

Saturday, May 19, 2007


This project, which I should have abandoned but didn't - (stubborn determination) started several years ago when I decided to paint sea shells on needlepoint canvas again. This time, however, they were "jeweled" and the colors were changed to kind of Mediterranean bright pastels. Being an amateur marine biologist, I used the pictures of actual shells so that they are anatomically correct, but just changed the colors and added sparkling "bump" stitches as jewels. The pink and yellow shell is a picture of an actual Mediterranean Scallop - and is actually that glorious combination of colors. Soooo - that picture became this on needlepoint canvas. The pink version one had no "pearls" on it, and looked a bit uninteresting - so I changed the color and added the jewels. A few weeks ago I needed something of this sort to use to demonstrate my "all over" beading technique on needlepoint - and decided to use this one. It was a forced decision - and after almost 40 years of professional designing I do know better, but will periodically try it anyway. From the beginning it was a disaster, but I kept on and on hoping it would get better, as there is a great deal of time invested in it - but it didn't. It never got any better in spite of my efforts and persistence. So I will put it away in a box and hope it doesn't "call" to me to get it out and try it again. I have named it the Shell from H~~~. The colors I like, but it is a bit boring to look at, and very boring to stitch - which defeats the whole purpose of a piece of needlework. Moral of the story is: Don't force it!!!! Just go with your better creative instincts.

Thursday, May 17, 2007


It is my preference to say that things like this are "points of departure" or "inspiration" (which this certainly is) for my needlepoint designing - but in some cases, it seems downright plagiarism of sorts. I am really enjoying these beautiful and unusual things I see on Allison's blog, and have made good use of them in the past few months. The colors, fabric choices, arrangement, and embellishments have made my work easier, so it has simply been a matter of figuring out which threads to use, which stitches would best imitate the effect of the background fabrics - and, of course, the top-stitched embellishments. This is a picture of details of seam treatments on one of the Fan Quilt border blocks, and I have really enjoyed choosing fibers and beads for the needlepoint version. I am limited, of course, by small space (it is a simple ornament) and colors and weights of the threads - but this is the special challenge that makes designing a pleasure! Also rather limiting is the canvas, which is a grid that must be considered. My finished version was lying on a sheet this morning waiting for a picture, when I noticed that it looked a lot better upside down - probably due to the visual weight of the beaded sections, so I am showing it this way. I will probably decide to take out the little white flowers and attempt to make them more "fanlike" as on the quilt block. The detail is to illustrate how the piece develops - a close-up - in preparation for incorporating beads and later embroidery. The "rick-rack" is what I call a "built-in." That is, it is stitched onto the canvas and not embroidered on top. As this is an ornament, the colors chosen are much brighter than the original quilt block. It will be finished with the addition of a backing, a bit of padding, and probably a lovely beaded tassel on the bottom. This is up to my friend Vikki, who does the most wonderful and imaginative finishing.

Friday, May 11, 2007

Planning for a Sept./Oct. article - and want to do it re: design sources for painted canvas. I ordered this wonderful, gaudy, "tourist style" Mexican Talavera plate from Mufungo on Wednesday, and received it by UPS on Thursday. Class act, this store! Even the box was nice. Anyway - I do love the primitive, hand painted things, and this one is complete with even a thumbprint in the underglaze. At the present time, it is lying on a white sheet, and as I walk by on my household errands, I turn it a bit - decision about which direction to use to put it on a square to make a pillow in needlepoint. I also chose this particular piece, as the colors will lend themselves nicely to Christmas mini-stockings and ornaments. I will challenge myself to see how many different things I can do with it. Maybe even a piece with some beads on it. (However, I am weary of beads at this time due to the Seashell from H~~~ fiasco.) Maybe later when I recover from that. What more could an Aging Artist want than Talavera plates and Art Crazy Quilts for inspiration??!!!!

Thursday, May 10, 2007


I deleted yesterday's post, and will try it again this morning. Still trying to move the pictures around.
Will see if this works better. Allison - please ignore this. I am too dense to live where this device is concerned, and son-in-law has left for work.

Tuesday, May 08, 2007


This won't make a lot of sense to anyone but a needlepoint designer - or a needlepointer who has purchased a canvas that was so badly painted that it was difficult to stitch. My grand daughter, Madeline, at age 12, decided to be Granny's apprentice during her last visit - and if I could find a copy painter who learned as quickly, I would hire help again and do markets!! I didn't want to mix oils for her, so just used some acrylics that I had on hand ( difficult to cover without clogging holes, and usually pretty streaky). I only told her once how to draw on needlepoint canvas - i.e., on the thread and not in the groove between the threads. She used a very light touch, as I instructed - and then drew her own designs. I have kept them in hopes of her learning some more textured stitches, my beading techniques, etc., and doing them for herself. She did a remarkable job!! The pieces are a bit streaky, but bear in mind this was her first attempt - and acrylics are hard to handle on needlepoint canvas.
The pink cross was her second drawing and painting after I showed her one time only how to make the cross symmetric on the canvas, and how to make the divisions in the center exactly on the 45 degree angles. I already had the pink paint mixed - I store it in the freezer of my refrigerator - so she used it instead of the acrylics, and did a lovely job of covering the background and keeping her edges neat. A bit of bleeding is there, but to be expected on a first attempt. This Granny is proud - and soooo grateful to have someone, at last, who is interested. She is a very busy girl, tho' - so it will be a while before she becomes a producing designer. Says she would rather be an archaeologist - her granny's clone indeed, as that was my first choice.

Wednesday, May 02, 2007


Having a bit of PPD here (post project depression) from finishing an article within the parameters of a deadline - which was further made stressful by my inability to learn a new electronic device quickly. i.e. my new digital camera. Anyway - this will be the subject of my article for Needlepoint Now magazine in the July/August issue - A New Look at Beads! I have loved using these small, sparkly/shiny things, and wanted to develop a way to use them outside Christmas ornaments. (and also give me an excuse to buy more.) This is an art nouveau tile of my own design - inspired by a book, of course, on the subject. The pattern itself is beaded "solid" with my simple method - which isn't beaded solid at all. The cream colored background has the beads spaced, and only for a bit of added interest. I am showing it in progress, as it is interesting to see how it is done and developed. I had been playing around with beads for several years when I got the bright idea of using beads on the weft while stitching my freehand plaid - one day when I was very tired of stitching little plaid things for my book. Voila! It actually looked beaded solid. Not as time consuming as one would think - and very very effective. I use only the Sundance Japanese seed beads (#14 for 18 mesh canvas, and #11 for 13 mesh), as they are the most consistent in size of any I have used - besides the fact that the colors and varieties of finishes seem endless. They range from glittery hexagonals to a soft, satin finish. I also enjoy using the #250 clear, as if I can't get exactly the color of the background threads, - (these are slightly irridescent, so give an extra bonus of surface) - I can simply apply them with floss the same color as the background threads - and the beads look the same color as the threads!! Great effect.

Tuesday, May 01, 2007


All better now, I think - I used the Rainbow Galleries "Petite Very Velvet" - which in basketweave looks just like a patch of velveteen. Now to find my stash of stuff to embellish. This is on top of an awful but hopefully temporary move, living out of boxes in my daughter's garage - that sort of thing. Oh yes - and buying a new digital camera that I am too stupid to use. Oh well. Learning is good.

Tuesday, April 17, 2007

It's morning now, and I was just looking at what I posted last night (very tired, I was) and have made a new resolution or two. 1. To learn how to do this properly and do it often. Blogging is new to me, and I need to explore the techniques and options and make it look better and be more informative and interesting. 2. Get a new digital camera, as the image quality is poor with mine - i.e. fuzzy pictures. Mine is one my sweet and supportive son-in-law gave me for learning. It took me a while, as I am a bit (or a lot) mechanically challenged. The first time I took pictures and managed to get them into the computer, I couldn't find them for three days. 3. Rip out that light green on the ornament and replace it with "petite Very Velvet" by Renaissance - in a darker green. Whatever was I thinking? Or was I thinking at all?? Ripping out is penance for me - terrible penance. BUT - I believe it was Beau Brummel who said "Haste is the enemy of perfection."

Monday, April 16, 2007


On playing with "fabrics" and effects replicated in needlepoint - the object of the preliminary stitching on the "Crazy Quilt" pieces is to duplicate the effect of the fabric patches, and not just make a sampler collection of textured needlepoint stitches. After all, the embellishment is the important part - in addition, of course, to the color selections and the shapes, etc. I started this exercise for myself in preparation for attempting Allison's beautiful block that was created for my first article in Needlepoint Now magazine - to be "out" next week. Small ornaments seemed to be the best way to practice and invent, so I chose a small border block from the Fan Quilt to begin. It is below in this blog, along with the assemblage of the stitching materials (the exciting part, but here it is again in case you missed it: Starting with the mottled purple patch, I found two purple silks in approximately the same colors, and used a simple stitch to show both. It seemed a good idea to further enhance by adding beads for a bit of sparkle. (better for a Christmas ornament) For the red, which is another fabric with shades, I used an overdyed cotton by Caron Collection, and by using a horizontally worked stitch, there are "shades" showing well but subtly. For the green, where the silk ribbon embellishment will be, I chose a silk and worked it in a simple textured stitch to avoid it's being boring, but not to overwhelm and fight with the embroidery. It is, after all, just a background. The gold patch seemed to require a diagonal pattern (in my mind), so it was worked in a slanted stitch with a satiny looking rayon ribbon floss - with gold beads for sparkle. This is what the unembellished ornament looks like: My mind is a bit foggy as I'm doing this - as I have been packing for the great move to my daughter's house until my new one is ready. Looking forward to it as an "extended visit." I do hope she is. Hopefully I will soon have this piece all embroidered with silk ribbon and other yummy things, and Vikki will add big beads and a wonderful tassel at the bottom.

Wednesday, April 11, 2007

I had really wanted to play with this new "toy" and show my needlepoint Crosses - designs inspired by Talavera ceramics - before Easter, but the very strange weather and late freeze and sleet had put me down with a respiratory infection - that's pretty sick when I can't play on the computer or stitch!! Anyway, here they are - and headed for the Dallas market this coming weekend.

Friday, March 30, 2007


A new addition to my already formidable stash is always exciting - although I am dreading having to pack it up and move it in May (hoping I will have a new house by then.) Anyway - I received these gorgeous silk ribbons yesterday from Cecelia at The Thread Gatherer, and am really motivated now to start embellishing the Art Crazy Quilt pieces in needlepoint that Allison has so generously let me use for my needlepoint "translations." I hope I am worthy of the task!!!!

Friday, March 23, 2007


In honor of Allison's visit to Mexico and being influenced by Talavera ceramics - a few more of my needlepoint renditions!!


This is the fun part!! Getting into the "stash" and choosing fibers and beads.


While Allie was gone luxuriating in primitive bliss in Mexico, I was working hard on practicing for THE BLOCK. I learned many years ago to do something of use so as not to waste time and materials when working out new effects- so this is how it begins:

I chose a colorful and interesting (klepped from her blog with her permission, of course) border block from the Fan Quilt (in progress) Starting with a small piece is easier - so I shaped it as a Christmas ornament - always a good use for small practice pieces.


This is the work table "in progress" (the paperweight cross with shells is one I made in pot class that I didn't send to the garage in disgrace). Notice that there are other JC Fan border blocks as well, and lots of tracing paper and little sketches, etc. Good "images" to impact the mind. I will begin stitching today!

Thursday, March 15, 2007


It has been a month since I made that resolution to post more often. Being busy is good, but time flies! It always seems to be of interest to people what inspires a designer - My earliest inspiration, and probably the best work of my life, was the Imari porcelain reproductions. Working from the early to mid 19th century Japanese pieces was a learning experience, and a visual joy. Also, the gorgeous colors and symbolism of the Chinese Celadon was inspiring. Recently I have re-discovered an old love of mine - the Mexican pottery. Now called "Talavera-style" to differentiate between that and the traditional Spanish Talavera maiolica (produced in Puebla since the 16th century), it is, by law, produced with no lead in the glazes, and is truly wonderful to behold. The exuberance and joy of the design and colors of the Mexican pottery is wonderful to work with. Talavera-style means that it incorporates the same symbolism as the very elegant Spanish pieces, along with the geometrics that I like as a mathematical challenge - and that symbolism actually kind of traveled the "silk road" all the way from the Orient to Spain many centuries ago. (as well as the colors) The Orientals were done on porcelain, whereas from the middle east toward the west, the ceramics were made of earthenware and glazed with tin oxide to get the white background. (This was quite a learning experience - I enjoyed researching it!) Anyway - besides rearranging motifs and turning round platters into square needlepoint pillows - it occurred to me to use those delightful colors and motifs on Christmas stockings - from mini-socks to full sized ones. I have never done Christmas per se in my almost 40 years of designing - there are plenty of very talented designers out there to do it, and it actually just never interested me. However, these little stockings are definitely different - and I think a nice change - from the same old thing that we are a bit weary of looking at.

Thursday, February 15, 2007


A new resolve!!!! I have spent so much time looking at OP blogs (Other People's) that I forgot to attend my own. They have been entertaining, motivating, and inspiring - so I shall try to do the same with mine. Lately I have been totally absorbed in designing and stitching interpretations of Art Crazy Quilts, and have spent hours and hours admiring and drooling over Allison Aller's work. (with her encouragement - and, I'm sure, curiosity.) Anyway - along with this suddenly dropped into my lap the opportunity for a designer profile on the Caron Collection web page - which includes pieces stitched totally with their threads. It has been a delightful experience exploring and discovering these gorgeous fibers - all natural and no synthetics. (except for a few decorative ones, which I will use for Christmas.) This piece hasn't been embellished yet - so here it is "before." "After" will follow shortly when this dreadful weather lets up and I can go shopping for more threads.
Notice on the close up that the little French knot "berries" appear to be shaded - this is one strand of the overdyed cotton "Watercolours" - delightful effect. I also used it on the flower "trim" where the shading is a bit more subtle.
The yellow patch includes my "beading technque." More on that later
Meanwhile, look at Allison's web page and also see her blog. Lots of good links, too. http://www.allisonannaller.com

Thursday, November 09, 2006


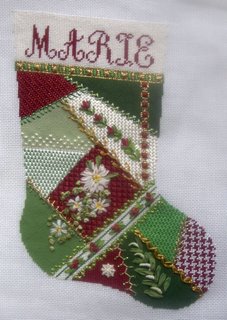
Wooo Hoooo!!! I finally overcame my fear of forgottten skills and finished the big one!! (The Marie stocking) The lower picture is showing the seam embellishment, which was lots of fun once I got started. Then, (top left picture) I started to play and create!! In the beginning on this one, I determined to absolutely use nothing but what I have in my stash - and everything in red, green, and gold. Would you believe, I had to buy nothing!!?? The only

problem I had was making myself stop. I had, in the beginning, thought to stay with tradition and history from years of studying and loving the Victorian crazy quilt - and then a new, very very talented friend and crazy quilt artist, unbeknownst to her, encouraged me, with all the wonderful fibers and fabrics and threads and beads and metallics we have at our disposal, to make it joyful and uninhibited and just plain exuberant. If you haven't found this lady, look at www.alliesinstitches.blogspot.com/ and sigh and dream and enjoy as I have over her work. With mine, in the off and on 9 years or so I have been working on "interpreting" crazy quilts in my own medium, needlepoint, I have endeavored to recreate with threads and stitches the textures of the fabrics themselves - and silks, velvets. etc. (even the houndstooth check is a "freehand" I have worked out). The laces and trims I have charted, as they are worked as an integral part of the stitching and not just lace glued or sewn on as some designers have done. The seam embellishments are done on top of the finished stitchery, and then - JOYFUL MOMENT the silk ribbon flowers are added. and a few beads here and there. And then I had to force myself to stop and plan the next one. The three mini-stockings are new also, and incorporate the animal skins I love for the beauty of their patterns and colors. I was especially pleased with the way my new "leaf trim" works with this theme. And my French Knots didn't fall out. MAJOR ACHIEVEMENT!! I will have the painted canvases for these and others similar as soon as I figure out how to write the stitch guides and instructions. Also, it's hard for me to put down the stitching now that I have it figured out!! I have spent happy hours studying Allison's beautiful work and figuring out how I would interpret a spray of yellow flowers and a scattering of small roses over several needlepoint patches!! WHAT INSPIRATION!

Tuesday, October 17, 2006


TRANSFER ART? A mis-nomer!! When we were first doing this about 35 years ago, we simply called it "making transparencies," and it was done by applying coats of acrylic polymer medium to a picture, and then adhering the resulting "decal" to whatever surface we wanted to decorate.
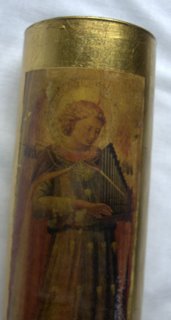
As I have mentioned so many times before, my love of beautifully made artisan crafted decorative accessories has led to what has been my passion/obsession and livelihood for many years. I was standing at the kitchen sink this morning and got the giggles at what I was doing - soaking eggshells and peeling out the membranes and stashing them in an old coffee can. Also washing out used tea bags to add to my "stash." (for collages). This is SSD at its worst - only mine isn't seasonal, but chronic. (seasonal stash disorder according to Jane Thornley of the beautiful knitting.) Mine also includes beads threads, yarn, fabrics, and anything else "crafty." My children are going to know for sure when they clean out my house that poor old Ma was a bit deranged - but they have probably suspected this for years. I also hoard graham cracker and cereal boxes for the cardboard. I will explain this one at a later date. Anyway - I was thinking back to the mid '60's when I first started doing these things "for serious" and selling my work. I used the money to hire a housekeeper. There were no chain craft stores and no "canned crafts." (kits) The activity was much more satisfying and materials used were not mysterious and expensive. There was a French papier mache artist whose production center was in San Miguel de Allende, Mexico - beautiful, exquisite work, mostly on wooden boxes, waste baskets, mirror frames - that sort of thing. Those items were sold in this country and probably in many others in fine boutiques for very high prices. I decided while living in Mexico City to drive over to San Miguel to investigate and learn the process if I could - and to my amazement, it was a lot of cotton cording, torn up newspaper, split peas and lentils, acrylic paint, and Elmer's glue. "Antiquing solution glaze" was instant coffee. Best of all, the "porcelainizing" was done with layers of glue and a coat of clear, high glss acrylic glaze. WOW!!! I studied a lot of crafts in Mexico, and came back with enough material to start my newspaper column, which soon became syndicated. The materials used for some of the fniest items were so simple - just things found around the house, and the knowledge of how to use them to make something beautiful. The illustrated glass vase doesn't show up well in this photo, but I found it at my son's house - a project for Christmas several years ago. I think the process is now being called "transfer art" and requires a bottle of something called "transfer medium." For the almost 40 years that I have been doing this, it has been a simple matter of making a transparency by coating a picture from a Christmas card or note card with Liquitex acrylic polymer medium/varnish, soaking in water, and rubbing the paper off the back. In this case, I applied the transparent "decal" over gold leaf (on a glass vase) which glows through the picture - GORGEOUS!! I also do candles this way, and the light glows through the picture, illuminating it. Instructions are given on my web page under "JOURNAL" - Go there and take a look!! and enjoy this art yourself and see what you can create.